 How-to
How to Frame a Basement Wall for Moisture Control
Last Updated: November 5, 2026
Quick Summary
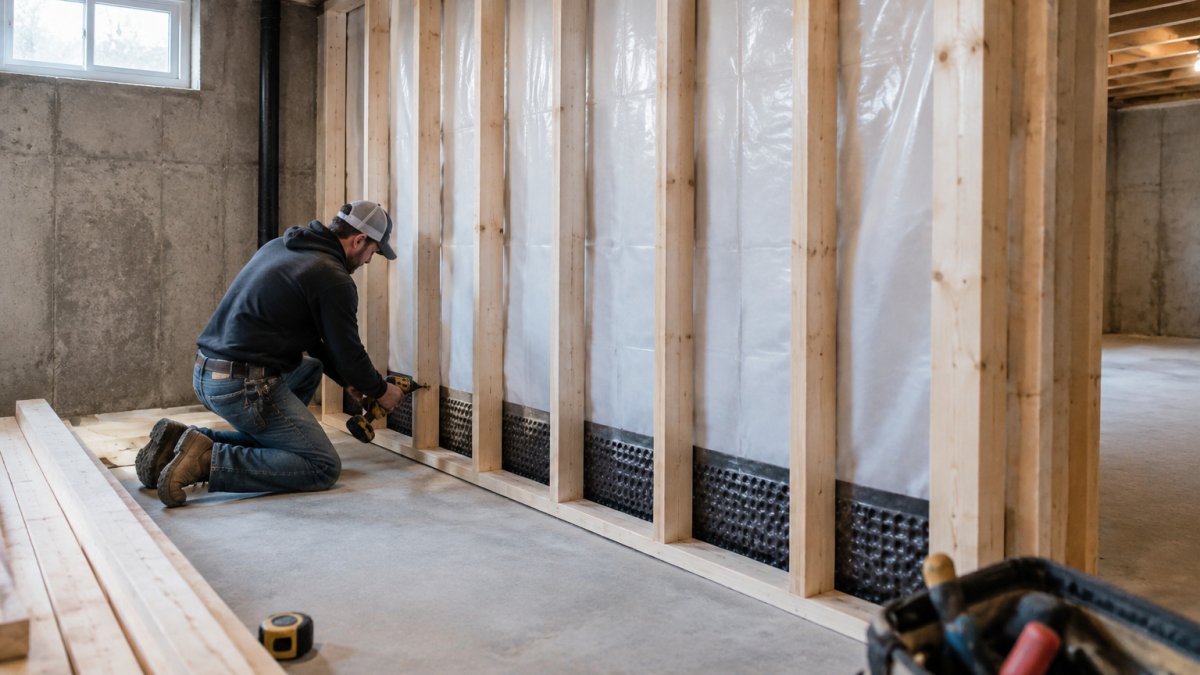
Effective basement wall framing for moisture control keeps wood off the concrete with a deliberate air gap and rigid foam against the wall, so the assembly can dry inward. Seal cracks first, use pressure-treated bottom plates raised off the slab, and finish with vapor-retarder paint instead of plastic sheeting.
- Tape a 12-inch square of 6-mil plastic to the concrete and check it after 48 to 72 hours.
- Moisture behind the plastic means water is moving through the concrete, so framing should wait.
- Press 1- to 2-inch closed-cell rigid foam to the wall and tape every seam.
- Raise pressure-treated bottom plates off the slab on polyethylene or a foam sill gasket.
- Use unfaced mineral wool or fiberglass in the stud cavities so the wall can dry inward.
Table of Contents
- Why Moisture Control Comes Before Framing a Basement Wall Against Concrete
- The Gap Between Basement Wall and Framing: Why It Decides Whether You Get Mold
- Framing Basement Walls With a Vapor Barrier: Where the Layers Go
- Your Basement Framing Diagram: Comparing Wall Assemblies Side by Side
- Step-by-Step: Installing Studs, Plates, and Insulation Without Trapping Moisture
- Handling Dampness and Drainage Before the Studs Go Up
- Common Mistakes and What to Verify After the Wall Is Closed
- Planning Your Basement Remodel With a Free Consultation
- Frequently Asked Questions
Why Moisture Control Comes Before Framing a Basement Wall Against Concrete
Basement wall framing against concrete without controlling moisture first is the fastest way to grow mold behind drywall.
Concrete is not waterproof. It wicks ground moisture and releases it as vapor. Trap that vapor behind a finished wall and you create a damp, dark cavity that mold loves.
That is why basement wall framing methods for moisture control start with diagnosis, not lumber. Below, we walk through how we assess a basement, choose an assembly, and build a wall that can dry.
What Old Bridge and Central New Jersey Homes Face
Central New Jersey sits on clay-heavy soil that drains slowly. After a wet spring, groundwater pushes against foundation walls for weeks.
Older homes often have block or poured walls with hairline cracks. Newer builds are tighter but still wick moisture. Both need the same respect: water finds a way in.
How to Diagnose Water Intrusion Before You Frame
Test before you build. Tape a square of plastic sheet to the concrete and check it after a few days.
- Condensation on the outside of the plastic: humid air, not a leak. Ventilation and a vapor retarder help.
- Moisture behind the plastic: water is moving through the concrete. Fix drainage and waterproofing first.
- Visible staining or efflorescence: active water intrusion. Stop and address it.
Watch out: framing over an active leak hides the problem until the drywall stains. Fix the source first.
The Gap Between Basement Wall and Framing: Why It Decides Whether You Get Mold
The gap between the basement wall and framing is a deliberate airspace, not wasted room. It lets the concrete dry inward and keeps wood away from a cold, wet surface.
Skip the gap and you press lumber against masonry. Moisture wicks into the bottom plate, and capillary action pulls it up the studs. That is how a wall rots from the bottom.
A clear airspace between concrete and wood, pressure-treated lumber at the floor, and no vapor barrier sandwiched against the foundation are sound practices for a wall that can dry in both directions.
U.S. Department of Energy guidance on basement insulation and moisture
Framing Basement Walls With a Vapor Barrier: Where the Layers Go
Framing basement walls with a vapor barrier works only when the layers sit in the right order and the vapor retarder's permeability matches the assembly.
The first decision is whether you need a vapor retarder at all. In a basement, the concrete wall is cold in summer and warm in winter, and moisture moves in both directions depending on the season.
A common assembly for basement walls, from concrete outward:
- Concrete wall, clean, dry, cracks filled with a hydraulic cement or polyurethane sealant
- Rigid foam insulation pressed to the wall, seams taped with foil or contractor tape, perimeter sealed with canned foam
- Wood stud wall set in front, held off the concrete by the foam thickness
- Insulation between studs, unfaced mineral wool or unfaced fiberglass, never a faced batt with the kraft paper against the foam
- Drywall finished with a vapor-retarder paint (typically 0.5 to 1.0 perm) rather than a plastic sheet
Rigid foam can serve as the main vapor control in this type of assembly, helping keep warm interior air from reaching the cold concrete face and reducing condensation on the wall.
Rigid Foam, Spray Foam, and Batt Insulation Against Concrete
Each insulation type handles moisture differently, and the trade-offs matter more than the marketing claims. Here is how we compare them for a basement wall:
| Insulation | Moisture Behavior | Best For | Watch Out |
|---|---|---|---|
| Rigid foam board (XPS or polyiso) | Closed-cell, resists wicking, 1 in ≈ 1.0 perm | Most basement walls | Tape every seam; polyiso loses R-value in cold |
| Closed-cell spray foam | Seals gaps and cracks, 2 in ≈ 0.5 perm | Irregular or block walls | Needs a pro applicator; off-gassing during cure |
| Fiberglass batts | Traps moisture if exposed to concrete | Stud cavities only, behind foam | Never touch concrete; use unfaced |
| Mineral wool | Resists moisture, drains well, non-combustible | Damp-prone areas | Higher material cost; heavier to install |
A general guideline is to keep fiberglass away from concrete. Rigid foam or closed-cell spray foam is typically placed against the wall, with unfaced insulation in the stud cavity so the wall can dry inward.
For a deeper look at insulation choices for local homes, see our guide to basement insulation benefits for NJ homes.
U.S. Department of Energy guidance on basement insulation and moisture
Your Basement Framing Diagram: Comparing Wall Assemblies Side by Side
A basement framing diagram makes the trade-offs obvious. We group the common assemblies into three types, and each one suits a different situation.
| Assembly | How It's Built | Strengths | Limits |
|---|---|---|---|
| Foam-first | Rigid foam on wall, studs in front | Best moisture control, dries inward | Costs more in materials |
| Stud-first with air gap | Studs set off wall, foam between | Simple, budget-friendly | Air gap must stay clear |
| Direct-apply furring | Furring strips on wall, foam between | Saves floor space | Least forgiving of moisture |
A foam-first assembly is often a strong choice for basements because it provides good protection against condensation on the cold foundation wall.
A stud-first approach can work when floor space is tight and the wall is already dry. Direct-apply furring carries more moisture risk and is generally best suited to dry, well-drained spaces.
Step-by-Step: Installing Studs, Plates, and Insulation Without Trapping Moisture
Before any lumber goes up, run the diagnostic sequence. Tape a 12-inch square of 6-mil plastic to the concrete in three spots, a low corner, a mid-wall, and near a crack, and check after 48 to 72 hours.
A typical sequence for framing a basement wall so it can dry instead of rotting:
- Seal the concrete. Fill cracks with hydraulic cement or polyurethane, and coat block walls where needed. Let cure fully.
- Install rigid foam. Press 1- to 2-inch closed-cell boards to the wall, tape all seams with foil or contractor tape, and seal the top, bottom, and perimeter with canned foam. Foil-faced polyiso needs a thermal barrier if left exposed.
- Set the bottom plate. Pressure-treated lumber rated for ground contact is commonly used, raised off the slab on a strip of polyethylene or a foam sill gasket to act as a capillary break that helps keep slab moisture out of the studs.
- Frame the studs. Space them at 16 or 24 inches on center per your plan, keep them off the concrete by the foam thickness, and use galvanized or stainless fasteners where they contact treated wood.
- Add top plates and blocking. Tie the wall together, leave the air gap intact, and block at openings and mid-wall for drywall support.
- Insulate the cavities. Use unfaced mineral wool or unfaced fiberglass so the wall can dry inward. Do not compress the insulation.
- Run wiring and outlets. Keep boxes clear of the foam, seal penetrations with foam or caulk, and coordinate with an electrician before drywall. Most jurisdictions require a permit for new circuits and outlets.
- Close with drywall. Finish with a vapor-retarder paint, not a plastic sheet, and keep the drywall at least 1/2 inch off the slab.
The raised bottom plate is a step that is often skipped. It keeps lumber off a floor that can sweat and is a low-cost moisture control measure.
Watch out: if you see bowing, horizontal cracks, or a wall that moves inward, stop. Those are structural signs that need a licensed engineer, not a framing crew.
Handling Dampness and Drainage Before the Studs Go Up
Drainage comes before framing, every time. If water pools at the wall base, no wall assembly will save it.
Start outside. Check gutters and downspouts, and make sure grading slopes away from the foundation. A downspout dumping next to the wall is a common culprit.
Inside, address any active seepage before you build. Perimeter drainage and a sump system may be needed. That is a job to sort out first, not after drywall.
For homes with recurring dampness, assessing the whole picture before framing is a sound approach. If you want the full process, read how to waterproof a basement before finishing.
Common Mistakes and What to Verify After the Wall Is Closed
The biggest mistake is putting a plastic vapor barrier flat against the concrete. It traps moisture against the wall and feeds mold.
Other common missteps include:
- Fiberglass batts pressed directly to concrete
- Untaped foam seams that leak air and vapor
- Bottom plates sitting right on the slab
- No air gap between studs and wall
After the wall is closed, check for musty smells, soft spots, and cool, damp drywall. A cheap humidity gauge helps too. Keep indoor humidity in check and ventilate the space.
Watch out: if you smell mildew within a season, the assembly is trapping moisture. Open it up before it spreads.
When it is time to choose flooring, see our list of basement flooring options for moisture control.
Planning Your Basement Remodel With a Free Consultation
Framing a basement wall is one step in a bigger project. Get the moisture plan right and the rest of the remodel holds up.
At PIONEER WOODWERX, we are a veteran-owned general contractor serving Central New Jersey. PIONEER WOODWERX & Remodeling works on basement remodeling, kitchens, bathrooms, decks, and aging-in-place modifications. If you want the full roadmap, read how to plan a basement renovation.
Ready to move from planning to building? Request a free consultation and we will walk your space with you.
Frequently Asked Questions
Do you need a vapor barrier when framing a basement?
It depends on the wall assembly. A vapor barrier on the warm side of the insulation can trap moisture against a cold concrete wall, so many builders use rigid foam insulation against the concrete and skip the interior polyethylene sheet. The goal is to keep the cavity dry and let the wall dry inward. Before choosing, check for active water intrusion; no vapor barrier fixes a leaking foundation.
Should there be a gap between a basement wall and the framing?
Yes, leaving an air gap between the concrete and the wood studs is a common practice. The gap keeps wood away from capillary moisture and allows the wall to dry. Many assemblies place rigid foam in that space, which also insulates the concrete. Keep the bottom plate off the floor with a moisture barrier or use pressure-treated lumber, and never sandwich untreated wood directly against concrete.
What is the best moisture barrier for basement walls?
Closed-cell spray foam or rigid foam board installed directly against the concrete is often the most reliable moisture-control layer because it seals and insulates in one step. A polyethylene sheet on the interior side is less forgiving if the wall gets damp. The right choice depends on whether the foundation is dry and whether you need insulation. Diagnose water problems first, then pick the assembly.
How do you stop moisture from reaching basement wall framing?
Start outside: fix grading, downspouts, and drainage so water moves away from the foundation. Inside, seal the concrete-to-wood connection with a capillary break, use rigid foam or spray foam against the wall, and leave an air gap where the assembly calls for one. Keep the bottom plate dry and avoid trapping moisture with an interior vapor barrier. If water still enters, address it before framing.
Your basement does not have to be a damp space you avoid. PIONEER WOODWERX brings dependable project management and quality craftsmanship to every basement remodel, from moisture diagnosis to the final finish. We build functional, attractive spaces that add lasting value to your home. Get started with PIONEER WOODWERX and turn your basement into a room your family actually uses.